How To Use Checklists
Understanding the Checklist View
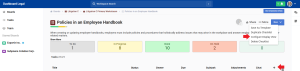
The checklist view provides a comprehensive overview of your project tasks and critical information associated with each task. Let’s dive into the many useful Checklist features shown below and how they help our users.

Status Overview: Color-coded bars indicate the overall progress of tasks (green for completed, yellow for in progress, and grey for not started).

Team Members: View all team members assigned to the checklist.

Task List: See all tasks organized by groups or individually. By default, each task displays its Title, Status, Owner, Due Date, Subtasks, Attachments, and Chat Comments, with the option to add additional preset or customizable fields.
Create Tasks: Users can add new individual tasks or groups of tasks using the “New Task” or “New Group” buttons.

Filter Tasks: Filter tasks by status or assigned team member simply by clicking either the status or team members at the top of the page (as seen in items 1. and 2. above).
Set Due Date Reminders: Click the bell icon next to tasks with assigned due dates to create an automated email reminder. Reminders can be sent directly to the task owner or custom recipients. The reminder can be set at a selected number of days before the due date, or on a specific date.

Task Management: Update an individual data point for a task by clicking the field and selecting a new option from the dropdown.

Bulk Task Updating: Update multiple tasks at once using the check boxes next to each task and the subsequent menu that appears upon selection

Task Detail View

When you select a task, the detail view provides additional in-depth information and management options:
Task Name: View and edit the task name at the top.
Status: Update the task status (e.g., “In Progress”) using the dropdown menu.
Assignee: See who is responsible for the task and make changes if necessary.
Due Date: Set or modify the deadline for task completion.
Description: Add or edit a detailed description of the task using the rich text editor.
Subtasks: Create and manage subtasks to break down complex tasks into smaller, manageable steps.
Attachments: Add relevant documents or files to the task.
Comments: Collaborate with team members by adding comments or questions.
Reminders: Set up reminders for task deadlines to ensure timely completion.